
By Marcin (Martin) Wiesiolek
Movement analysis stands as one of the most potent tools in the ski instructor’s repertoire. With a thorough understanding of this tool, it becomes invaluable, both in identifying the mechanics behind skiing and in providing solutions for students on the fly. At its core, movement analysis is a tool that allows us to break down and examine the body’s positioning, its movements, their timing, and power behind the movements. By doing so, we can better understand how these factors impact the performance of the skis and identify any potential issues or areas for improvement. With this understanding, we can choose the right coaching cue, be it internal or external, or adopt a progression. This allows us to address any challenges or seize opportunities to enhance our student’s skiing or our own, guiding us toward skiing proficiency objectives.
The Challenge in Movement Analysis Proficiency
One thing I’ve noticed with candidates across all certification levels is a certain hesitation or unease when it comes to movement analysis – or to put it another way, they’re not quite proficient with it yet. For movement analysis to be genuinely effective during ski lessons or clinics, you’ve got to be really good at it. If you miss the mark in pinpointing a skier’s area in need of a change, you risk using a good chunk of your lesson or clinic without getting closer to the objectives. Being adept means understanding every facet of a skier’s ability, from body posture, its movements, to the coordination and strength of these actions. It’s about comparing this to when every aspect is performed optimally. In other words, it’s about measuring one’s skiing against the best standards in a manner that allows you to create actionable steps for a change in your student’s or own skiing. Yet, discerning the differences between a student’s (or your own) ski skills and top-notch skiing, and then devising the right adjustments to bridge those gaps, is no walk in the park. Hence this tool’s potency doesn’t present itself on day one. To truly harness its capabilities requires significant practice. Instructors who limit their understanding of movement analysis to exam materials risk seeing it as a source of anxiety rather than an invaluable coaching tool.
Movement Analysis for Personal Progress
Harnessing the power of movement analysis is not only vital for coaching but it can also be a key tool for every cross country skier’s personal growth. By taking the time to dissect and understand your own skiing, you open the door to numerous transformative benefits.
- Self-awareness: Regularly evaluating your own cross country skiing skills broadens your self-awareness, highlighting both your strengths and areas needing improvement. This introspection goes beyond mere error identification; it delves into understanding the nuances of your movements and the rationale behind every glide, stride, and poling action.
- Feedback Loop: Acting as your own critic fosters an immediate feedback mechanism. Instead of relying solely on an external coach’s observations, you can self-correct in real-time or post-session, maximizing the utility of each practice.
- Empathy in Teaching: Recognizing and surmounting your own challenges equips you with a unique perspective when instructing others, nurturing a sense of empathy. This insight allows you to resonate with the triumphs and hurdles your students or athletes might face.
- Enhanced Communication: As you refine your capacity to spot and rectify your skills and techniques, your ability to articulate insights to students improves. This enriched understanding facilitates clearer, more actionable guidance.
- Continuous Learning: Cross country skiing, like all sports, is dynamic, with evolving skills, techniques, equipment, and strategies. Persistent self-analysis ensures you remain attuned to the latest methodologies, constantly learning and adapting.
In summary, movement analysis, while an invaluable coaching asset, also holds immeasurable worth for personal growth. It’s a testament to the perennial learning journey that every cross country skier undertakes, regardless of their proficiency level. And as you elevate your own skills, you’re better positioned to elevate those of your students or athletes.
A Simple Guide to Embracing Movement Analysis
Develop a System
When you’re in the middle of a lesson or clinic, you’ve got to be quick with your movement analysis, so you really need a straightforward system. Consider movement analysis as a tool—it guides the direction of your lesson or clinic but isn’t an end in itself. You’ll probably find yourself doing this analysis more than once in a session. Every time a student tries out a new skill or sets a different goal, it’s worth taking a quick moment to re-evaluate with a new movement analysis. This helps keep everything aligned with where the student wants to go. Here’s a suggested framework to consider:
- Observe and Note: Start with observing and noting what exactly was the body position, body movements, timing, and power application of those movements as well what the skis and poles were doing in each phase of skiing, that is during push-off, weight transfer, and glide. This is your what-when-how. Instead of resorting to value judgments like “good” or “bad” (e.g., “good body position”), observe and describe the body’s position and actions, as well as the equipment’s behavior, using value-neutral terms. Be specific in your observations and aim for simplicity.
- Assess What You’ve Seen and Its Impact: Next, evaluate whether what you observed was effective in achieving the skier’s goals. Essentially, assess how the skier’s actions influenced their skiing results. This step in movement analysis is often referred to as establishing cause and effect. Having the clarity of what was the cause and what was the effect is vital for both instructor and student alike before attempting to change anything in their skiing.
- Compare to Optimal Skiing: Then, compare your observations to your mental image of optimal skiing. What did you spot as differences between the skier you observed and your mental image of optimal skiing? I use the word “optimal” to suggest the most efficient way of skiing given an individual’s current abilities, conditions, and equipment.
- Formulate a Plan: Finally, once you’ve compared and identified areas for improvement (or recognized opportunities to enhance efficiency) and have established the cause and effect, it’s time to create a plan. This might involve adjusting the body position, its movements, the timing/coordination between the upper and lower body during specific or all phases of skiing, or the power application of the skier’s movements. It may also involve adjustments or correction to the student’s ski equipment. The aim is to bridge the gap between the student’s current technique and what’s considered optimal for skiing efficiency, helping them get closer to their skiing objectives. Remember, movement analysis is but one aspect of a comprehensive ski lesson or clinic—it’s not merely an academic exercise.
How to develop a mental picture of optimal skiing? Utilize established sources to observe elite skiers and analyze their movements as a form of exercise in movement analysis. This will help you develop a clear mental image of their skiing. ■ FIS Cross Country: https://www.youtube.com/@FISCrossCountry ■ PSIA Matrix Videos: https://www.thesnowpros.org/education/the-matrix-videos/ ■ Andy Newell’s Nordic Team Solutions: https://nordicteamsolutions.com/ ■ Nordic Ski Lab: https://nordicskilab.com/ ■ Para cross country skiing: https://www.youtube.com/results?search_query=paralympics+cross+country+skiing+ ■ YouTube tutorials of expert skiers |
Watch Your (Imprecise) Language
Using clear and specific language in movement analysis is essential for your own understanding of the sport and all it entails, and for you to be able to be helpful to your students. Ask yourself: Did my choice of words accurately describe the body or ski equipment performance and then did they effectively convey the cause and effect relationship? Here are the potential pitfalls you might encounter if you’re not careful with your language during movement analysis or, indeed, throughout the entire lesson or coaching session:
- Lack of Precision: Sports require precise movements for optimal performance. Imprecise language can lead to misunderstandings about what exact action or adjustment is required. Avoid value judgements and thus labeling skiing or actions as simply “good” or “bad”.
- Missed Opportunities for Improvement: Without specificity, you or your student might overlook key nuances in their technique that, if addressed, could lead to significant improvements.
- Difficulty in Measurement: To track progress, changes need to be measurable. Ambiguous descriptions don’t provide a clear baseline or subsequent points of measurement.
- Reduced Communication Effectiveness: Coaches, instructors, students, and athletes need to be on the same page. Ambiguous language can lead to confusion, mixed signals, and, ultimately, a breakdown in the coach-student relationship.
- Potential for Injury: Precise movements are necessary not just for performance but for safety. Ambiguous instructions can lead to incorrect form or technique, increasing the risk of injury.
- Inhibits Feedback Quality: Whether you’re giving feedback to a student or analyzing your own movements, it needs to be actionable. Vague or ambiguous feedback doesn’t offer clear steps for improvement.
- Stunts Skill Development: Mastery of any sport involves the refinement of specific skills. Without clarity in analysis, students might practice inefficiently or reinforce bad habits.
Movement Analysis in More Detail
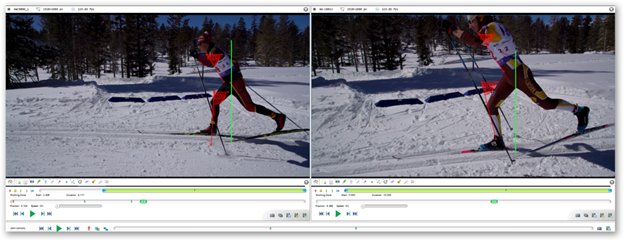
Recording: Record a video of your student’s skiing session or your own, and then review the footage. Pay special attention to the ‘what-how-when’ during all phases: propulsion (or push-off), weight transfer, and glide. When recording, it’s helpful to have a specific focus in mind. Utilizing slow-motion can offer deeper insights. Depending on your focus, film from the side, front, back, or consider capturing all angles.
Observe and Focus on Specifics: Examine body positions, movements, their timing, and the power application of the skier’s movements as well as skis and poles throughout each phase. If you’re uncertain about what to observe, begin with straightforward yes-or-no questions. Examples of such questions, from addressing beginner skier to expert skier :
- Did the opposing arm and leg move forward simultaneously in the diagonal stride?
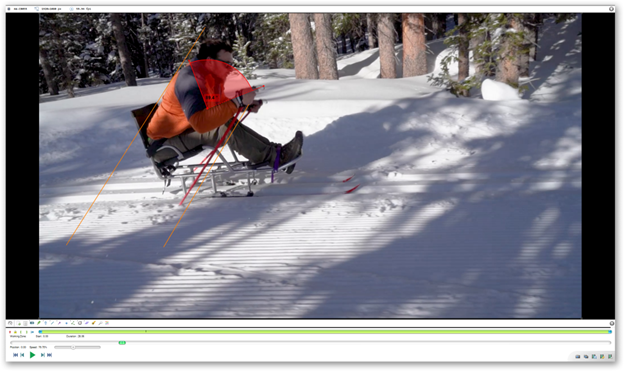
- Did both skis of the sit-ski maintain contact with the snow on the turn?
- What was the angle of the ankle flexion during the glide phase?
- Did the ski touch the snow before one foot passed the other in diagonal stride?
- In the V1, did both poles make contact with the snow at the same time as one ski during recreational skiing?
- In the V1 bounding, was the time gap between the athlete’s foot landing and the pole push too long, affecting the efficiency of forward movement?
- Was the strength of the pole push proportionate to the strength of the leg push in the given context?
|
Tips: ● Your aim is to identify consistent patterns rather than isolated moments of mistakes or excellence. ● Keep in mind that the movement analysis for standing skiers and those with physical disabilities, including sit skiers, is consistent for the body parts that are accessible and in use. ● It might seem a bit odd to make notes when everything seems perfect with the skier. However, remember that the goal is to carefully evaluate the skier’s body position, movements, timing, coordination, and how they apply these skills to their skiing techniques. This systematic approach helps us spot areas where there might be room for improvement or ensures that the skier is executing the task as instructed. So, even if you’re using movement analysis to check if the skier has incorporated previous feedback and is following the task’s guidelines, it’s a valid and valuable application of this approach. ● Video recording can be incredibly beneficial if you have the means to quickly record the skier using a phone or tablet. It lets you slow down the skiing action and go over different phases with the student. When you review the video, just keep the feedback constructive, not judgmental. While analyzing the video indoors has its place, the best feedback for a skier is the kind they can use right away to practice and improve. |
What to observe and note:
- Body Position & Movements:
- During each skiing phase, examine the body’s position and its forward tilt. For standing skiers, focus on the angle at the ankle, knee and hip joints, and for sit skiers, concentrate on the hip joint.
- Center of mass in relation to the base of support. For standing skiers, this base is their feet. For sit skiers, it’s the range between the front and back attachment points on the sit-ski frame.
- Hip positioning and movement.
- Shoulder alignment and movement.
- Lower Body Action:
- Weight transfer from one ski to the other.
- Leg extension during push-off.
- Range of motion in the ankle, knee and hip joints.
- Upper Body Action:
- Synchronization of arm and leg/lower body movements.
- Poling technique, including pole plant and push-off.
- Arm swing.
- Rotation and lean of the trunk for turns and direction changes.
- Foot Action:
- Foot placement when transferring weight from ski to ski, specifically considering how much it moves past the other foot before bearing the full weight.
- Foot placement when gliding.
- Balance & Stability:
- Maintenance of balance during glide phases.
- Stability during weight transfers and turns.
- For sit skiers, balance involves both core stability and equipment management.
- Trunk Stability and Mobility (in sit skiing):
- Observe the sit skier’s ability to stabilize their trunk in the sit ski that is used for ensuring efficient power transfer.
- Look at the sit skier’s ability to rotate and lean the trunk for turns and direction changes.
- Equipment Interaction with the Snow:
- Ski edging of the ski in skate skiing or during turns.
- Ski grip zone’s effectiveness during classic skiing.
- Ski-to-snow contact.
- Ski glide length.
- Pole length and angle relative to the snow during poling.
- For sit skiers, evaluate the fit and function of the bucket (the seat in the sit ski) and the support it provides for optimal movement.
- For sit skiers, pole use is crucial for both propulsion and steering.
- Timing & Rhythm:
- Coordination and timing of arm and leg movements.
- Rhythm maintained during various techniques like the V1, V2, and diagonal stride and during transitions.
- Breathing & Stamina:
- Breathing patterns relative to skiing rhythm.
- Endurance and pacing, especially in longer races.
- Transitions & Techniques:
- Switching between different skiing techniques, e.g., from double poling to diagonal stride.
- Technique selection based on terrain and conditions.
- Observe how the sit skier initiates and completes turns. For some sit skiers, this may involve a combination of upper body movements and equipment adaptations.
Identify Inconsistencies: Compare your student’s ski and pole actions, body position, movements, and their timing to the standards of optimal skiing. For skis, this involves contact with the snow, edging, flattening, and turning. For poles, it’s about their contact with the snow.
Set Targets: Based on observations, set specific improvement targets. Instead of broad goals like “improve glide,” aim for more specific ones such as “keep the body more upright during the glide phase.” Be clear about desired adjustments in terms of body position, movement, and timing as well as the goal of those adjustments.
Practice with Intent: After identifying areas of improvement and outlining actionable steps for your student, head to the trails together with a focused plan to work on these specific areas. This deliberate approach can lead to more focused practice sessions.
Consistent Analysis: Improvement is a continuous journey. Regularly record and analyze skiing sessions, noting progress and any new areas that might need attention. Immediate feedback accelerates improvement. Once you’ve assessed your student’s performance, implement changes and let them try again.
Use Technology: There are apps and software available that can break down videos into slow motion, compare side-by-side with professional skiers, or provide biomechanical analysis.
- Sprongo: https://sprongo.com
- Kinovea: https://kinovea.org
- Dartfish: https://www.dartfish.com
- Onform: https://www.onform.com
- CoachNow: https://coachnow.io
Reflect and Adjust: After each session, reflect on the changes your student made and their effects. Based on this reflection, help your skier create new goals and a pathway for attaining them.
The Role of Effective Movement Analysis
This article delves deeply into movement analysis because it’s a complex subject. Yet, in reality, you often have only a few minutes, or even just one minute, to use it with a student. That’s why it’s vital to become really good at it. If you’re inaccurate or it takes too long, your teaching won’t be effective.
In essence, while movement analysis isn’t a standalone lesson or training session, it’s an essential skill in the coaching toolkit, guiding both the instructor and student towards more efficient, or closer to optimal, skiing. Instructors and coaches who invest time in honing this skill not only elevate their teaching abilities but also become better skiers themselves. The path to proficiency in cross country skiing, whether as a learner or an instructor, runs through effective and diligent movement analysis.
About the author:
Marcin (Martin) Wiesiolek is a seasoned ski instructor with expertise in cross country, Alpine, and adaptive skiing. He lives in Grand Junction, Colorado.
A special thank you to Scotty McGee for content editing. Scotty instructs and guides in cross country, telemark, and Alpine skiing in Jackson, Wyoming. He’s also a four-time member of the Professional Ski Instructors of America National Nordic Team.